- HOME - SDR & GNU Radio - RPi PROJECTS - RADIO RPi PROJECTS - NUC 8 - SATELLITES - WEATHER SATELLITES - RADIO ASTRONOMY - QRZ -
 |
WA9ONY |

|
- HOME - SDR & GNU Radio - RPi PROJECTS - RADIO RPi PROJECTS - NUC 8 - SATELLITES - WEATHER SATELLITES - RADIO ASTRONOMY - QRZ -
 |
WA9ONY |

|
This is a collect of Raspberry Pi (RPi) computer projects that David Haworth, WA9ONY has done in order to learn how to use the RPi.
These projects range from building a RPi P3 Model B system (Project 1) to the simple task of setting the RPi date and time (Project 26).
There is a separate web page, Amateur (Ham) radio RPi projects, that demonstrates how to use the RPi computer in amateur (Ham) radio and in electronics applications.
The above photo show three different Raspberry Pis.
In 2018 over 19 million RPis have been sold to students, hobbyist and used in commercial products. This results in a very large installed base of RPi users, applications, hardware, softwares and infrastructure to learning about RPi hardware and software.
There are several generations of Raspberry Pi (RPi) computers.
The Raspberry Pi official operating system software is Raspbian. But, other operating system software can be used on the RPi.
The RPi Raspbian includes many programs as part of the standard install process using the Element14 NOOBS 16 GB SD card.
RPi has a large online repository of software ready to be automatically downloaded and installed on the RPi.
RPi Information & Stores
RPi Hardware
Display System & Video
RPi Zero W
Power Supply
Raspbian OS
Networking
Other OSes
Audio & Sound System
RPi Apps
Utilities
CLI: Command Line Interface
Programming
GPIO: General Purpose Input/Output
Miscellaneous
These projects demonstrate how to assemble a RPi computer system and how to use the Raspbian operating system and its software.
Learn what is needed. Gather components and assemble the Raspberry Pi P3 Model B computer.
Setup the operating system preferences.
This goal is to identify the standard programs in the GUI that are installed by Element14 NOOBS micro-SD card. Raspbian is a Debian-based computer operating system for Raspberry Pi. Raspbian uses PIXEL, Pi Improved Xwindows Environment, Lightweight as its main desktop environment.
Click on the below links to learn more about these programs at Wikipedia.
This goal is to use an USB memory devices with the RPi to move files to/from the RPi. An USB memory is used as a backup to the user files on the RPi micro-SD card.
An Internet connect is required to update the RPi software. The update process can take a long time, greater than one hour. The installation process might ask you questions, therefore check it so often.
Updating RPi GPU firmware.

The MagPi is the official magazine of the Raspberry Pi Foundation. It is available as a free download. Also, learn how to save PDFs from the Internet and view them on the RPi.
You will need an Internet connection.
Second method, you will need an Internet connection. Change the issue number for the issue you want to download.
MagPi guides.
View the download magazine PDF.
MagPi on the Internet Archive.
Create a library on a USB memory device for PDF files from the Internet. For example, PDF issues of The MagPi magazine are stored in the library. The benefit of having the library on a USB memory device is not taking up storage space on the RPi SD card. Also, you can easy move the library on USB memory device to other computers.
You will need an Internet connection and USB memory device.
Next copy The MagPi issue 55 that was download in Project 5 to the Library.
Add the PDF version of this web page to the Library.
To save web pages to the RPi use the wget command in the Terminal window.
Save the web page at http://www.stargazing.net/david/rpi/ to the Download directory. In the URL the last part is rpi which is a directory (folder). The web server will send the file index.html when no file name is in the URL.
Save the PDF file (Raspberry%20Pi%20Hints.pdf) at http://www.stargazing.net/david/rpi/ to the Downloads directory. Notice the %20 in the file name mean space character.
Save the MP3 audio File from ARRL 5 WPM Code Practice Archive to the Downloads directory. Use wget to download the 5 WPM Code Practice Archive audio file.
Save the MP3 text File from ARRL 5 WPM Code Practice Archive to the Downloads directory. Use wget to download the 5 WPM Code Practice Archive text file.
Using what you have learn in the previous projects save these file to the USB memory device Library folder.
It is important to be able to back up the RPi and restore all the files. There are many ways to doe this. Below is the procedure to create a copy of the micro-SD card that is in your RPi.
First, you will need as micro-SD card equal to or larger than the micro-SD size in your RPi.
Secondly, you need a micro-SD to USB adapter to make at copy with the micro-SD in the USB port.
When a web page has useful information that you want to refer to when you have no Internet access you can save the web page as a PDF file to your RPi for off line viewing.
The web page of Wikipedia Raspberry Pi is saved as a PDF to the RPi.
This example uses RPi 3 Model B with Google Chromium web browser. This was installed by the Element14 NOOBS 16 G SD card.
YouTube videos are are great source of information. Below a way to download a YouTube video and view it off-line.
This example uses RPi 3 Model B with Google Chromium web browser. This was installed by the Element14 NOOBS (New Out Of the Box Software) 16 G SD card.
To play the video use omxplayer in the Terminal window. The omxplayer is a command line program.
A HDMI TV that supports audio is used as the monitor for the RPi. To use the audio output jack on the RPi board use the command. Use the command man omxplayer for more details on the omxplayer.
Using what you have learn in the project 6 to save the video file to the USB memory device Library folder.
The PRi computer can run different operating systemsi. Raspbian is the official operating system. Raspbian is a Debiab distribution of the Linux. Linux is based on UNIX.
Raspbian has two primary user interfaces: LXDE (Lightweight X11 Desktop Environment) desktop GUI (graphical user interface) and the CLI (command line interface).
In 2016 Raspbian LXDE GUI was improved with PIXEL (Pi Improved Xwindows Environment, Lightweight).
The RPi Raspbian can be configured to power-on into the LXDE PIXEL desktop GUI or the CLI.
To access the CLI in the PIXEL Desktop GUI open a Terminal window with the Terminal icon in the top menu bar.
If the PIXEL Desktop is not running you start PIXEL Desktop GUI by entering the command startx in the CLI.
During the first time power-on the software will create the username pi with password raspberry.
The default power-on auto login is to login in as 'pi' user. This can be changed by:
Another user name is super user. Use the sudo (super user do) command in front of another command to run the command with admin privileges.
A computer file contains date/information, executable program code, etc.
In Raspbian the file name is case sensitive. There for the file example/ and Example are two different files. It is good practice to use file extensions to tell the RPi what is file type and as a result what program should be used to open it.
For example, file example.txt is a text file and Raspbian would use Leafpad to open it when double clicking on the example.txt file in File Manager.
Another example, file example.pdf is a Portable Document Format file and Raspbian would use xpdf program to open it when double clicking on the example.pdf file in File Manager.
It is a good computer practice to use file extension on the files you create.
List of Raspbian file extensions and the Desktop default programs that will open them.
Directories (also called folders) are a way to organize files and directories.
Directories/folders contain files and other Directories/folders. The Directories/folders are organized in hierarchal directory tree. The top directory is called root and is represented by "/" Character. One of the directories in the root directory is the home directory. The home directory contains the directories and files of users. In a typical PRi system of on one user there is only the pi directory for the username pi. In the pi directory is where all the files create by the user pi should be saved. The user can create directories and sub directories in pi directory to organize files.
In the PIXEL Desktop GUI use File Manage to view, move, create, rename and delete directories and files. File Manager is started by clicking on the File Manager icon in the top menu bar.
In the CLI text commands are used view, move, create, rename and delete directories and files.
GIMP ( GNU Image Manipulation Program) is a free raster graphics editor that is in the RPi online repository.
Internet connection is required and commands in the CLI are used.
To install GIMP.
Install GIMP help.
To uninstall GIMP and GIMP help.
Using GIMP F1 help.
GIMP website.
GIMP resources:
Additional information is at
This CLI program downloads YouTube videos to the RPi.
To install youtube-dl program.
To uninstall youtube-dl.
Play saved YouTube video file in Downloads directory.
The youtube-dl saves the video file with the same name as the YouTube title.
Additional information is at /usr/share/doc/youtube-dl.
The RPi default shell is the bash shell. The bash shell is used at the CLI (command line interface) to work with the RPi Linux kernel and other programs on the RPi.
There are somethings that can only be done using the CLI (command line interface). For example, installing programs on the RPi as shown in project 16 installing GIMP.
The CLI is used when the PIXEL Desktop GUI is not being used and the CLI is used in the PIXEL Desktop GUI Terminal program. The benefit of using the PIXEL Terminal is mouse cut and past editing is supported.
Using the CLI.Mouse operation:
Ctrl key operation
Keyboard arrow keys operation
Other special operations.
Help and manual information
CLI text editors
CLI display a text file
Clear the CLI display or clear Terminal window.
MagPi magazine is a free download.
List of Linux commands from the MUFIC_IT_2008 Group.
Python 3 is a programming language that is part of the standard install of the Raspbian overtiring system.
The below steps show how to create a Python 3 program to print Hello World.
Run the Python 3 hello_world.py program in the CLI.
For help on python3 in CLI enter.
Start the Python 3 hello_world.py program in PIXEL Desktop File Manager.
The file extension .py tells the RPi to use Python 3 to open the hello_world.py file.
To learn Python
If you have never programmed, check out
Use a command in the CLI to show the monitor display resolution.
The HDMI monitor needs to be on before turning the RPi in order to use the HDMI fill display resolution. Other wise, the HDMI resolution will be at 4:3 @ 640x480.
There are several types of memory in the RPi. The computer board RAM memory, micro-SD card memory and USB flash memory devices.
Different version of RPi boards have different sized of RAM. A summary table of the different board RAM sizes is at Raspberry Pi
Sometime a program can be unresponsive and you can not control it, stop it or close it.
To stop or kill a unresponsive program.
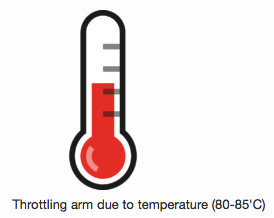
The RPi monitors the CPU temperature. When the temperature rises high a thermometer is shown on PIXEL Desktop in the upper right corner.
When my RPi CPU temperature is 80.6 C the thermometer is shown on the PIXEL Desktop. Use heat sinks on the CPU and memory IC to help reduct the IC temperature.
The RPi P3 Model B CPU with heat sink and case cover off with room temperature of 21.0 C.
To show RPi CPU temperature.
The RPi monitors the CPU clock frequency. The higher the CPU clock the faster the CPU runs and quicker the software runs.
The RPi P3 Model B CPU clock frequency at 0% CPU usage is 600 MHz. The RPi P3 Model B CPU clock frequency at 85% CPU usage is 1200 MHz.
To show RPi CPU clock frequency.
VLC media player is the VideoLAN project's media player. It plays MPEG, MPEG-2, MPEG-4, DivX, MOV, WMV, QuickTime, WebM, FLAC, MP3, Ogg/Vorbis files, DVDs, VCDs, podcasts, and multimedia streams from various network sources. VLC can also be used as a streaming server that duplicates the stream it reads and multicasts them through the network to other clients, or serves them through HTTP.
VLC has support for on-the-fly transcoding of audio and video formats, either for broadcasting purposes or for movie format transformations. Support for most output methods is provided by this package, but features can be added by installing additional plugins (vlc-plugin-fluidsynth, vlc-plugin-jack, vlc-plugin-notify, vlc-plugin-samba, vlc-plugin-sdl, vlc-plugin-svg, vlc-plugin-zvbi).
The below installation uses the PIXEL Desktop GUI.
To open VLC.
VideoLAN VLC media player website.
The RPi will automatically set the date and time if the RPi is connected to the Internet. If no Internet connect durning power-on you can set the date and time in the CLI as shown below. The RPi does not have a battery clock circuit keeping time when it is turned off.
Get date and time.
PIXEL Desktop wallpaper is the image in the background of the PIXEL Desktop. The RPi has a select of different images that can be used for wallpaper.
Get date and time.
The RPi power supply requirement is compatible with USB chargers and portable USB power banks. The USB power banks is a battery with electronic circuits to charge a battery operated USB device such as cell phones, tablets, etc. Therefore, the portable USB power bank can be used to power the RPi.
USB power banks output a standard 5 Volts at different current rates. My RPi power supply is rate 5 Volts at 2.5 Amperes. Therefore, I use a 2.5 Amperes USB power bank.
USB power banks have different storage capacity. Storage capacity is typically rated in mAh (mill Ampere hours). The large the mAh rating, the larger the storage capacity, the longer the RPi will operate from the USB power bank.
I use a HyperGear Dual USB Power Bank Model #13460 with dual 2.5 A and 2.1 A outputs. The Power Bank lithium-ion batter capacity is 16,000 mAh. A micro USB cable is needed to connect the Power Bank to the RPi.
If the RPi is running 2,000 mA, I hope to operate the RPi for about eight hours, almost a fill day with the Power Bank. A future project is to bench test the performance of the HyperGear Dual USB Power Bank operating time with the RPi.
The HyperGear Dual USB Power Bank was on sale for $17.99 at Fry's Electronics.
There are some RPi operations that can only be done in the CLI. If you are follow instructions using the CLI it is easy to copy commands from the instructions like web pages or other electronic documentation and past those commands into the Terminal CLI to run them.
Terminal provides a CLI in a PIXEL Desktop window that supports mouse copy and past operations. As a result, The mouse can be used to copy text in the Chromium Web Browser (like CLI commands) and then paste the text into the Terminal window to be run. Thus, saving typing the command in the Terminal CLI and avoiding typing errors.
For example,
Terminal does not have a save to file function. But, you can select CLI Termain text with the mouse, copy this text and past the text into Text Editor to be save as a .txt text file.
Sign up for the free Raspberry Pi Foundation Raspberry Pi Weekly newsletter at Subscribe web page.
View the Raspberry Pi Weekly archive.
The MagPi magazine is the official Raspberry Pi magazine.
Raspberry Pi Internet videos are located at YouTube and Vimeo.
The Raspberry Pi Foundation forum is a great place to search for RPi information and answers to questions.
The Wikipedia Raspberry Pi web page has a specifications table comparing the different series and models of RPis.
RPi B+ GPIO pinout diagram and RPi photo with callouts is in the Element14 article Adding a Shutdown Button to the Raspberry Pi B+ The B+ GPIO pinout is the same as P3 Model B. The B+ photo is similar to the P3 Model B, but missing the WiFi ant, etc.
The Raspberry Pi 3 Model B Frequently Asked Questions (FAQs)
The Raspberry Pi printed books that I have used.
Free online Raspberry Pi PDF books.
The Raspberry Pi online tutorials, workshops and classes.
ImageJ is an image processing and analysis program inspired by NIH Image.
ImageJ can display, edit, analyze, process, save and print 8-bit, 16-bit and 32-bit images. ImageJ can read many image formats including TIFF, GIF, JPEG, BMP, DICOM, FITS and "raw". ImageJ supports "stacks", a series of images that share a single window. ImageJ can calculate area and pixel value statistics of user-defined selections. ImageJ can measure distances and angles. It can create density histograms and line profile plots. ImageJ supports standard image processing functions such as contrast manipulation, sharpening, smoothing, edge detection and median filtering. Spatial calibration is available to provide real world dimensional measurements in units such as millimeters. Density or gray scale calibration is also available. ImageJ is developed by Wayne Rasband (wayne@codon.nih.gov), is at the Research Services Branch, National Institute of Mental Health, Bethesda, Maryland, USA.
The below installation uses the PIXEL Desktop GUI.
To open ImageJ.
Additional information is at /usr/share/doc/imagej.
Raspberry Pi Foundation created the Raspberry Pi computers and a great website with many resources to learn how to use a RPi.
Links
Audacity is a multi-track audio editor for Linux/Unix, MacOS and Windows. It is designed for easy recording, playing and editing of digital audio. Audacity features digital effects and spectrum analysis tools. Editing is very fast and provides unlimited undo/redo. Supported file formats include Ogg Vorbis, MP2, MP3, WAV, AIFF, and AU.
The below installation uses the PIXEL Desktop GUI.
To open Audacity.
Audacity website
Additional information is at
Stellarium renders 3D photo-realistic skies in real-time. With Stellarium, you really see what you can see with your eyes, binoculars or a small telescope.
Some features:
Stellarium should not be used for very high accurate calculation or ephemerids like eclipse predictions. However, it is the ideal program to prepare an observation evening with naked eye, binocular, or small telescope.
The Stellarium data files package contains data files required by Stellarium. They include textures, star catalogues and translations.
The below installation uses the PIXEL Desktop GUI.
To open Stellarium.
Stellarium website
Additional information is at
It is a good practice to correctly turn off a RPi.
The method to turn-off a RPi depends upon if the PIXEL Desktop GUI is being used.
Using PIXEL Desktop GUI.
Not using PIXEL Desktop GUI method 1.
Not using PIXEL Desktop GUI method 2.
Other references:
Small HDMI displays may be difficult to use at full 1080 resolution.
In PIXEL Desktop GUI the display resolution can be changed after power-on.
Using the PIXEL Desktop GUI.
Power-on time to PIXEL Desktop GUI.
Using 32 GB SD, show PIXEL screen when starting Desktop GUI and
HDMI TV monitor at 16:10, 1680x1050 @ 60 Hz progressive.
Element14 RPi benchmark tests.
During the Element14 launch video the RPi 3 Model B core performance was reported to be 10X faster than the first RPi.
The RPi has several ways to get help off-line.
In the PIXEL Desktop GUI.
In the CLI use the following commands and options. Different commands support different types of help.
In the CLI some commands support the following options.
Environment variables contain a variety of information that range from the user logged on to the search path used to locate commands.
In CLI use the following commands to show the value of the environment variables.
Examples of environment variables.
PIXEL Desktop GUI is based on X Window System. X Window System is also called X11 Window System. X applications run on the PIXEL Desktop GUI.
This package provides a miscellaneous assortment of X applications that ship with the X Window System, including:
Install X Applications.
Example using screenshot (screen dump). The file extension needs to be <.wxd>.
To view the screenshot (screen dump) <file_name>.wxd.
X Window System user's guide : for X11 R3 and R4 of the X Window System
Manuals information.
In project 49 the screenshot .wxd file is converted to a a more common .png file.
Additional information is at /usr/share/doc/x11-apps
RPi computer file names are case sensitive.
RPi hidden files start with a period (.).
File name general guidelines.
File name general guidelines.
File extensions tables.
ImageMagick is a software suite to create, edit, and compose bitmap images. It can read, convert and write images in a variety of formats (over 100) including DPX, EXR, GIF, JPEG, JPEG-2000, PDF, PhotoCD, PNG, Postscript, SVG, and TIFF. Use ImageMagick to translate, flip, mirror, rotate, scale, shear and transform images, adjust image colors, apply various special effects, or draw text, lines, polygons, ellipses and Bézier curves. All manipulations can be achieved through shell commands as well as through an X11 graphical interface (display). This package include links to quantum depth specific binaries and manual pages.
The below installation uses the PIXEL Desktop GUI.
To open ImageMagick.
In project 47 the screenshot was saved as a .wxd file. Below the convert command is used to change it to a more common .png file.
ImageMagick website
Additional information is at
XFig is a menu-driven tool that allows the user to draw and manipulate objects interactively in an X window. The resulting pictures can be saved, printed on postscript printers, or converted to a variety of other formats (e.g. to allow inclusion in LaTeX documents or web pages) using the transfig program. This package contains the xfig program itself. You should think about installing the transfig package to export the graphics to several common formats. You should also think about installing xfig-doc, which contains the documentation and xfig-libs, which contains several clip art libraries.
The below installation uses the PIXEL Desktop GUI.
To open XFig.
XFig website
Additional information is at
The RPi default shell is the bash shell. The bash shell is used at the CLI (command line interface) to work with the RPi Linux kernel and other programs on the RPi.
To show the shell being used by the RPi use the below command.
Job control is managing how programs are run in the foreground or background, halted and stopped (killed). The benefit of job control is a local or remote terminal is used to manage several program jobs at the same time. This will be very important capability when controlling the RPi by a remote computer using Secure Shell (SSH) and the RPi has no keyboard, mouse or display (headless operation).
Job control Ctrl-key commands:
Job control commands:
The below job control examples use the Terminal program in the PIXEL Desktop GUI and the xclock program from project 47. (man xclock) By using the clock with seconds hand it is easy to see when clock is running or stopped.
The clock takes about 10 seconds to start up and the clock will report some errors that does not seem to affect its operation.
Example 1, shows the clock as a foreground job that stops the Terminal from being used for other jobs. Ctrl-c kills the job and the Terminal is back to normal operation.
Terminal | Clock | Comments |
Command prompt |
| |
xclock -analog -update 1 | Start the clock | |
No command prompt | Clock running in the foreground |
|
Ctrl-c | Clock is killed | Ctrl-c kills the current job |
Command prompt |
|
Example 2, shows starting the clock with background & option.
The fg command moves the clock to the foreground job resulting in locking the Terminal from being used for other jobs. Ctrl-c kills the job and the Terminal is back to normal operation.
Terminal | Clock | Comments |
Command prompt |
| |
xclock -analog -update 1 & | Start the clock | |
Command prompt | Clock running in the background |
|
Ctrl-c | Clock running in the background | Ctrl-c has no effect on the background job |
fg | Clock running in the foreground | fg moves the job to the foreground |
Ctrl-c | Clock is killed | Ctrl-c kills the current job |
Command prompt |
|
Example 3, shows the foreground job being halted and being put in the background using Ctrl-z.
Use the kill command to tell the clock job.
Terminal | Clock | Comments |
Command prompt |
| |
xclock -analog -update 1 | Start the clock | |
No command prompt | Clock running in the foreground |
|
Ctrl-z | Clock is stopped ticking | Ctrl-z halts clock & puts clock in background |
Command prompt |
| |
fg | Clock running in the foreground | fb starts the clock & moves it to foreground |
Crtl-z | Clock is stopped in background |
|
bg | Clock is running in background |
|
ps | Clock is running in background | Get the PID number of clock |
kill PID_number | Clock is killed | Kill job with PID number |
Command prompt |
|
Ardour is a multichannel hard disk recorder (HDR) and digital audio workstation (DAW). It can be used to control, record, edit and run complex audio setups. Ardour supports pro-audio interfaces through the ALSA project, which provides high quality, well designed device drivers and API's for audio I/O under Linux. Any interface supported by ALSA can be used with Ardour. This includes the all-digital 26 channel RME Hammerfall, the Midiman Delta 1010 and many others.
Ardour has support for 24 bit samples using floating point internally, non-linear editing with unlimited undo, a user-configurable mixer, MTC master/slave capabilities, MIDI hardware control surface compatibility. It supports MIDI Machine Control, and so can be controlled from any MMC controller and many modern digital mixers.
Ardour contains a powerful multitrack audio editor/arranger that is completely non-destructive and capable of all standard non-linear editing operations (insert, replace, delete, move, trim, select, cut/copy/paste). The editor has unlimited undo/redo capabilities and can save independent "versions" of a track or an entire piece Ardour's editor supports the community-developed LADSPA plugin standard.
Arbitrary chains of plugins can be attached to any portion of a track. Every mixer strip can have any number of inputs and outputs, not just mono, stereo or 5.1. An N-way panner is included, with support for various panning models. Pre- and post-fader sends exist, each with their own gain and pan controls. Every mixer strip acts as its own bus, and thus the bus count in Ardour is unlimited. You can submix any number of strips into another strip.
Ardour's channel capacity is limited only by the number on your audio interface and the ability of your disk subsystem to stream the data back and forth. JACK (the JACK Audio Connection Kit) is used for all audio I/O, permitting data to be exchanged in perfect samplesync with other applications and/or hardware audio interfaces.
Ardour is sample rate and size neutral - any hardware formats from 8 to 32 bits, and
rates from 8kHz to 192kHz. Internal processing in 32/64 bit IEEE floating point format.
Further information can be found at
The below installation uses the PIXEL Desktop GUI.
To open Ardour 3.
Ardour version is 3-3.403~dfsg-3.
Ardour website
Additional information is at /usr/share/doc/ardour3
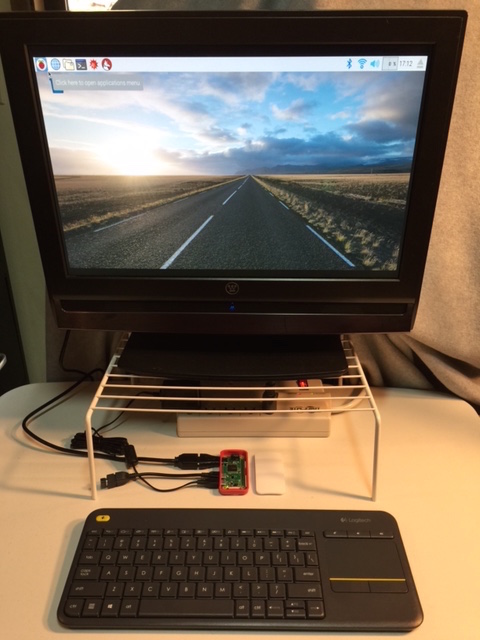
RPi Zero W is a very low cost RPi with
WiFi
with reduced performance and functionality as compared to the RPi P3 Model B.
YouTube
Get components and assemble the Raspberry Pi Zero W computer.
First power on and setting up the operating system.
RPi Zero W computer performance comparison.
Power-on time to the PIXEL Desktop GUI.
After the software instal it is a good idea to update the RPi.
See
Project 4: Update RPi Software and GPU Firmware.
To Do:
The default RPi user name is pi and it's default password is raspberry.
It is important to change the default password when using the RPi a network to prevent attacks by others against the RPi.
See password strength for more information.
The below password change process uses the PIXEL Desktop GUI.
The default Raspbian shell is the bash shell.
The bash shell is used in the command line interface (CLI) to interface with the RPi Linux kernel and with RPi programs.
The CLI is used when the PIXEL Desktop GUI is not being used.
The CLI is used in the PIXEL Desktop GUI Terminal program.
The benefit of using the PIXEL Terminal is mouse cut and past editing is supported.
For more bash shell projects are at:
The bash shell allows creating scripts to make using the CLI easier.
The below shell script, updateRPi, was created to update and upgrade the RPi software and firmware.
Bash commands explaination:
The software and firmware update/upgrade commands are described in Project 4: Update RPi Software and GPU Firmware
Bash script file updateRPi (updateRPi.txt file for easy download)
#!/bin/bash
#
# update RPi software and firmware
# David Haworth, WA9ONY
#
echo ---updateRPi bash command >>updatelog.txt
date >>updatelog.txt
echo >>updatelog.txt
echo ---update software >>updatelog.txt
echo ---update software
sudo apt-get update >>updatelog.txt
echo >>updatelog.txt
echo ---upgrade >>updatelog.txt
echo ---upgrade software
sudo apt-get upgrade -y  >>updatelog.txt
echo >>updatelog.txt
echo ---dist-upgrade >>updatelog.txt
echo ---dist-upgrade software
sudo apt-get dist-upgrade -y >>updatelog.txt
echo >>updatelog.txt
echo ---firmware_update >>updatelog.txt
echo ---rpi-update >>updatelog.txt
echo ---update firware
sudo rpi-update  >>updatelog.txt
echo >>updatelog.txt
date >>updatelog.txt
echo ---updateRPi completed >>updatelog.txt
echo ---updateRPi completed
echo Please reboot RPi
Creating a bash shell script requires creating the above updateRPi text file with the bash shell commands and making the updateRPi file an executable file.
The Terminal window example of using updateRPi.
pi@raspberrypi:~ $ ~/updateRPi
---update software
---upgrade software
---dist-upgrade software
---update firware
---updateRPi completed
Please reboot RPi
pi@raspberrypi:~ $
The updateRPi script create a updatelog.txt log file.
---updateRPi bash command
Mon Apr 10 10:31:45 PDT 2017

---update software
Hit http://archive.raspberrypi.org jessie InRelease
Hit http://mirrordirector.raspbian.org jessie InRelease
Hit http://mirrordirector.raspbian.org jessie/main armhf Packages
Hit http://archive.raspberrypi.org jessie/main armhf Packages
Hit http://mirrordirector.raspbian.org jessie/contrib armhf Packages
Hit http://mirrordirector.raspbian.org jessie/non-free armhf Packages
Hit http://archive.raspberrypi.org jessie/ui armhf Packages
Hit http://mirrordirector.raspbian.org jessie/rpi armhf Packages
Ign http://archive.raspberrypi.org jessie/main Translation-en_US
Ign http://mirrordirector.raspbian.org jessie/contrib Translation-en_US
Ign http://archive.raspberrypi.org jessie/main Translation-en
Ign http://mirrordirector.raspbian.org jessie/contrib Translation-en
Ign http://mirrordirector.raspbian.org jessie/main Translation-en_US
Ign http://archive.raspberrypi.org jessie/ui Translation-en_US
Ign http://mirrordirector.raspbian.org jessie/main Translation-en
Ign http://mirrordirector.raspbian.org jessie/non-free Translation-en_US
Ign http://archive.raspberrypi.org jessie/ui Translation-en
Ign http://mirrordirector.raspbian.org jessie/non-free Translation-en
Ign http://mirrordirector.raspbian.org jessie/rpi Translation-en_US
Ign http://mirrordirector.raspbian.org jessie/rpi Translation-en
Reading package lists...

---upgrade
Reading package lists...
Building dependency tree...
Reading state information...
The following packages were automatically installed and are no longer required:
  libjs-prettify libllvm3.7 libqscintilla2-11 libqscintilla2-l10n libruby1.9.1
  libruby1.9.1-dbg libtcl8.5 libtcltk-ruby1.9.1 libtk8.5 ri1.9.1 ruby1.9.1
  ruby1.9.1-dev ruby1.9.1-examples ruby1.9.1-full ruby1.9.3 supercollider
  supercollider-common supercollider-ide supercollider-language
  supercollider-supernova tcl8.5 tk8.5
Use 'apt-get autoremove' to remove them.
0 upgraded, 0 newly installed, 0 to remove and 0 not upgraded.

---dist-upgrade
Reading package lists...
Building dependency tree...
Reading state information...
The following packages were automatically installed and are no longer required:
  libjs-prettify libllvm3.7 libqscintilla2-11 libqscintilla2-l10n libruby1.9.1
  libruby1.9.1-dbg libtcl8.5 libtcltk-ruby1.9.1 libtk8.5 ri1.9.1 ruby1.9.1
  ruby1.9.1-dev ruby1.9.1-examples ruby1.9.1-full ruby1.9.3 supercollider
  supercollider-common supercollider-ide supercollider-language
  supercollider-supernova tcl8.5 tk8.5
Use 'apt-get autoremove' to remove them.
0 upgraded, 0 newly installed, 0 to remove and 0 not upgraded.

---firmware_update
---rpi-update
 *** Raspberry Pi firmware updater by Hexxeh, enhanced by AndrewS and Dom
 *** Performing self-update
 *** Relaunching after update
 *** Raspberry Pi firmware updater by Hexxeh, enhanced by AndrewS and Dom
 *** Your firmware is already up to date

Mon Apr 10 10:32:13 PDT 2017
---updateRPi completed
Creating bash scripts/commands
Linux
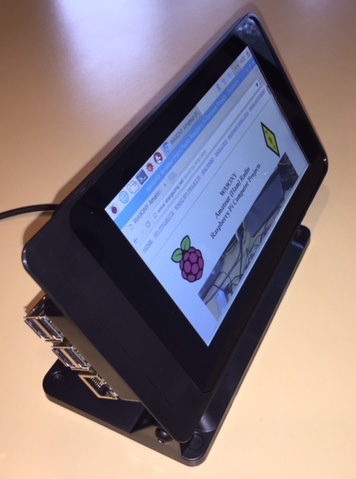
The Raspberry Pi 7" Touchscreen Display provides a small, portable computer.
What is needed:
Smarti Pi Touch case for official Raspberry Pi display YouTube installation:
Install touch keyboard:

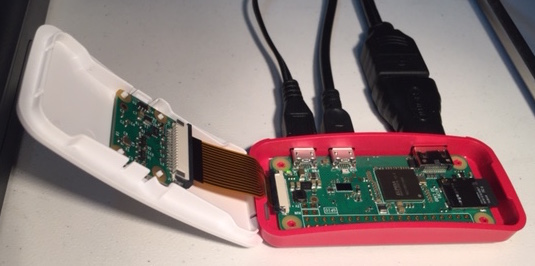
The standard RPi Zero W case supports installing the Pi Camera V2 in the case cover.
The case cover has a hole for the Pi Camera V2 lens.
The standard RPi Zero W case includes three different case covers.
What is needed:
Installing the Pi Camera V2 in the RPi Zero W case cover:
Configure the Pi Zero W software to use the camera.
Test the camera.
For more details see the older Pi Camera V1 documentation.
The Pi Camera V2 installed in the standard RPi Zero W case cover faces vertically.
This project builds a case holder with Legos to position the camera horizontal.
What is needed:
The ALSA: Advanced Linux Sound Architecture is the Linux framework of sound.
Install ALSA player and utilities. The ALSA utilities are needed for using Software Defined Radio.
The below installation uses the PIXEL Desktop GUI.
To open Alsaplayer to play a MP3 audio file:
Rtl_sdr and aplay help

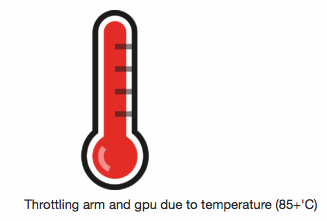
|
Warning icons will display in the upper right corner of the display.

RPi battery operation makes the RPi a compact portable Linux computer.
What is needed:
A key part of networking is the computer's IP address.
Finding the Raspberry Pi IP address.
Finding the Mac OS X IP address.
Finding the iPhone or iPad iOS IP address.
Finding the Microsoft Windows IP address.
Finding the Android IP address.
Fing Network IP address scanning tool.
SSH provides a secure way to control the RPi by another RPi or computer.
SSH needs to be enable on both computers.
SSH needs the RPi
RPi P3 Model B controlling a RPi Zero W with camera.
Example of taking a RPi Zero W camera picture by remote SSH.
pi@raspberrypi:~ $ ssh pi@10.0.0.20
The authenticity of host '10.0.0.20 (10.0.0.20)' can't be established.
ECDSA key fingerprint is d3:cf:59:b4:86:09:08:cc:13:62:2b:28:ae:fd:e1:6e.
Are you sure you want to continue connecting (yes/no)? yes
Warning: Permanently added '10.0.0.20' (ECDSA) to the list of known hosts.
pi@10.0.0.20's password:

The programs included with the Debian GNU/Linux system are free software;
the exact distribution terms for each program are described in the
individual files in /usr/share/doc/*/copyright.

Debian GNU/Linux comes with ABSOLUTELY NO WARRANTY, to the extent
permitted by applicable law.
Last login: Fri Apr 14 16:51:30 2017
pi@raspberrypi:~ $ raspistill -v -o test.jpg

raspistill Camera App v1.3.11

Width 3280, Height 2464, quality 85, filename test.jpg
Time delay 5000, Raw no
Thumbnail enabled Yes, width 64, height 48, quality 35
Link to latest frame enabled  no
Full resolution preview No
Capture method : Single capture

Preview Yes, Full screen Yes
Preview window 0,0,1024,768
Opacity 255
Sharpness 0, Contrast 0, Brightness 50
Saturation 0, ISO 0, Video Stabilisation No, Exposure compensation 0
Exposure Mode 'auto', AWB Mode 'auto', Image Effect 'none'
Metering Mode 'average', Colour Effect Enabled No with U = 128, V = 128
Rotation 0, hflip No, vflip No
ROI x 0.000000, y 0.000000, w 1.000000 h 1.000000
Camera component done
Encoder component done
Starting component connection stage
Connecting camera preview port to video render.
Connecting camera stills port to encoder input port
Opening output file test.jpg
Enabling encoder output port
Starting capture -1
Finished capture -1
Closing down
Close down completed, all components disconnected, disabled and destroyed

pi@raspberrypi:~ $ ls
Desktop    Music     python_games  test1.jpg  test4.jpg  Videos
Documents  Pictures  Templates     test2.jpg  test5.jpg
Downloads  Public    test0.jpg     test3.jpg  test.jpg
pi@raspberrypi:~ $ exit
logout
Connection to 10.0.0.20 closed.
pi@raspberrypi:~ $
For ssh help
Related projects:
Android SSH
In project 63 we saw how to run commands on a remote RPi using SSH.
A picture was taken and the picture file in the remote RPi home directory.
SSH File Transfer Protocol allows copying the image file to the controlling computer.
SH File Transfer Protocol example:
pi@raspberrypi:~ $ sftp -h
usage: sftp [-1246aCfpqrv] [-B buffer_size] [-b batchfile] [-c cipher]
          [-D sftp_server_path] [-F ssh_config] [-i identity_file] [-l limit]
          [-o ssh_option] [-P port] [-R num_requests] [-S program]
          [-s subsystem | sftp_server] host
       sftp [user@]host[:file ...]
       sftp [user@]host[:dir[/]]
       sftp -b batchfile [user@]host

pi@raspberrypi:~ $ sftp pi@10.0.0.20:test.jpg
pi@10.0.0.20's password:
Connected to 10.0.0.20.
Fetching /home/pi/test.jpg to test.jpg
/home/pi/test.jpg                             100% 4421KB   1.4MB/s   00:03
pi@raspberrypi:~ $
For sftp help
How To Use SFTP to Securely Transfer Files with a Remote Server
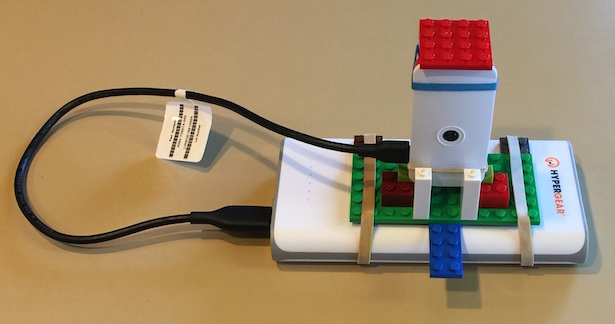
This is a RPi Zero W with Pi Camera V2 in a standard RPi Zero W case with Lego blocks holding the case vertical.
The small round camera lens is in the center of the RPi case.
The RPi Zero W is powered with an USB Power Bank that supports 2.5 A.
Another RPi P3 Model B or MacBook remotely controls the RPi Zero W to take pictures and copies the pictures from the RPi Zero W using Wi-Fi and SSH/ SFTP (SSH File Transfer Protocol).
Hardware:
Software:
Fing on iPhone is used to determine the RPi Zero W IP address.
Terminal Example for SSH connection, taking a photo, list directory and closing the session.
pi@raspberrypi:~ $ ssh pi@10.0.0.20
pi@10.0.0.20's password:

The programs included with the Debian GNU/Linux system are free software;
the exact distribution terms for each program are described in the
individual files in /usr/share/doc/*/copyright.

Debian GNU/Linux comes with ABSOLUTELY NO WARRANTY, to the extent
permitted by applicable law.
Last login: Fri Apr 21 15:15:45 2017 from 10.0.0.9

pi@raspberrypi:~ $ raspistill -v -o test14.jpg

raspistill Camera App v1.3.11

Width 3280, Height 2464, quality 85, filename test14.jpg
Time delay 5000, Raw no
Thumbnail enabled Yes, width 64, height 48, quality 35
Link to latest frame enabled  no
Full resolution preview No
Capture method : Single capture

Preview Yes, Full screen Yes
Preview window 0,0,1024,768
Opacity 255
Sharpness 0, Contrast 0, Brightness 50
Saturation 0, ISO 0, Video Stabilisation No, Exposure compensation 0
Exposure Mode 'auto', AWB Mode 'auto', Image Effect 'none'
Metering Mode 'average', Colour Effect Enabled No with U = 128, V = 128
Rotation 0, hflip No, vflip No
ROI x 0.000000, y 0.000000, w 1.000000 h 1.000000
Camera component done
Encoder component done
Starting component connection stage
Connecting camera preview port to video render.
Connecting camera stills port to encoder input port
Opening output file test14.jpg
Enabling encoder output port
Starting capture -1
Finished capture -1
Closing down
Close down completed, all components disconnected, disabled and destroyed

pi@raspberrypi:~ $ ls
Desktop    Music     python_games  test12.jpg  test1.jpg  test4.jpg  Videos
Documents  Pictures  Templates     test13.jpg  test2.jpg  test5.jpg
Downloads  Public    test0.jpg     test14.jpg  test3.jpg  test.jpg
pi@raspberrypi:~ $ exit
logout
Connection to 10.0.0.20 closed.
pi@raspberrypi:~ $
Terminal Example for SFTP (SSH File Transfer Protocol) coping the photo from the RPi Zero W.
pi@raspberrypi:~ $ sftp pi@10.0.0.20:test14.jpg
pi@10.0.0.20's password:
Connected to 10.0.0.20.
Fetching /home/pi/test14.jpg to test14.jpg
/home/pi/test14.jpg                           100% 3908KB   1.3MB/s   00:03
pi@raspberrypi:~ $
SSH with -Y option can open a X11 window from the remote RPi on the local RPi.
PIXEL Desktop GUI File Manager is a X11 application called pcmanfm.
X11 forwarding example using File Manager.
pi@raspberrypi:~ $ ssh -Y pi@10.0.0.20 pcmanfm
pi@10.0.0.20's password:
** Message: x-terminal-emulator has very limited support, consider choose another terminal
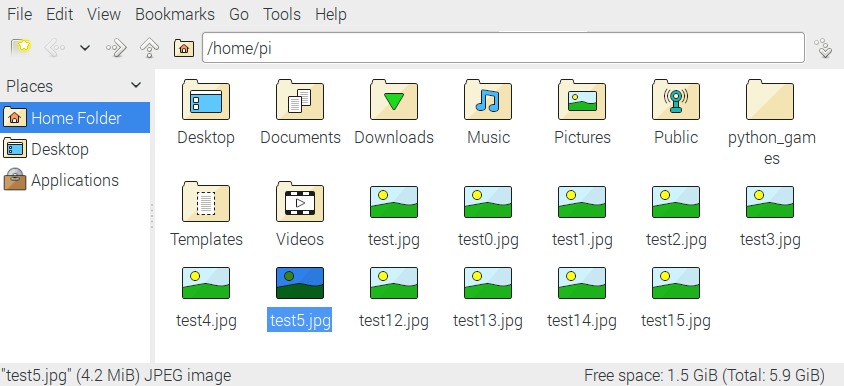
The remote RPi File Manager opens in a X window on the local RPi.
How to remote control Raspberry Pi
X11 Forwarding with RPi, PuTTY, and Android by KC9ZYZ
X Window System user's guide : for X11 R3 and R4 of the X Window System
SoX is the Swiss Army knife of sound processing programs.
SoX is a command line utility that can convert various formats of computer audio files in to other formats. It can also apply various effects to these sound files during the conversion. As an added bonus, SoX can play and record audio files on several unix-style platforms. SoX is able to handle formats like Ogg Vorbis, MP3, WAV, AIFF, VOC, SND, AU, GSM and several more. Any format support requires at least libsox-fmt-base. Some formats have their own package e.g. mp3 read and write support is provided by libsox-fmt-mp3. SoX supports most common sound architectures i.e. Alsa, Libao, OSS and Pulse (respectively provided by libsox-fmt-alsa, libsox-fmt-ao, libsox-fmt-oss and libsox-fmt-pulse). It also supports LADSPA plugins.
The below installation uses the PIXEL Desktop GUI.
SoX play is used in the rtl_fm guide.
This myRPi.sh Bash shell script logs a variety of RPi hardware and software information to a myRPiLog.txt file.
myRPi.sh example
pi@raspberrypi:~ $ ~/myRPi.sh
log file is myRPilog.txt
---myRPi.sh information results are in myRPilog.txt file
---myRPi.sh information completed
pi@raspberrypi:~ $
myRPiLog.txt example from the RPi Zero W.
Creating bash scripts/commands
Linux
Bash scripting YouTube videos.
Android app.
When you need help remembering the CLI (command line interface) commands use the PIXEL Desktop GUI Application Menu, Run to list all the commands starting with the first two letters.
When using the CLI (command line interface) type the first two letters of the command and then the TAB key twice. It will take a second or two and list of commands starting with those two letters will be listed.
Command-line Completion example by Wikipedia.
Example: ls TAB-KEY TAB-KEY
pi@raspberrypi:~ $ ls
ls           lsblk        lscpu        lslocks      lspgpot
lsattr       lsb_release  lsinitramfs  lsmod        lsusb
pi@raspberrypi:~ $ ls
Example: up TAB-KEY TAB-KEY
pi@raspberrypi:~ $ up
update-alternatives         update-icon-caches.gtk2
update-ca-certificates      update-info-dir
update-catalog              update-initramfs
update-default-aspell       update-java-alternatives
update-default-ispell       update-locale
update-default-wordlist     update-mime
update-desktop-database     update-mime-database
update-dictcommon-aspell    update-mime-database.real
update-dictcommon-hunspell  update-nodejs-and-nodered
update-fonts-alias          update-passwd
update-fonts-dir            update-python-modules
update-fonts-scale          update-rc.d
update-gconf-defaults       update-usbids
update-gsfontmap            update-xmlcatalog
update-icon-caches          uptime
pi@raspberrypi:~ $ up
Auto fill example: upt TAB-KEY
pi@raspberrypi:~ $ upt
Entering the TAB-KEY will auto fill the rest of the command as shown below.
pi@raspberrypi:~ $ uptime
The RPi Zero W with Pi Camera V2.0 is setup for headless (no keyboard and no display) operation. It runs off a battery for portable operation.
A RPi P3 Model B remotely controls the RPi Zero W with Pi Camera V2.0 by Wi-Fi. Both RPi are connected to the same Wi-Fi router. RPi Zero W IP address is 10.0.0.20.
The RPi Zero W boots up in user pi and into the PIXEL Desktop GUI.
Both RPis SSH is enabled.
A RPi P3 Model B has three Terminal windows open.
The above three windows work fine on a MacBook Pro (OS X Yosemite V10.10.5) using Terminal and X11 Window System from XQuartz.
A RPi Zero W.
Download takepics.sh
#!/bin/bash
#
# takepics.sh bash script
# Created for RPi Zero W and Pi Camera V2.0
# David Haworth, WA9ONY
# http://www.stargazing.net/david/RPi/index.html
#
# Check for number of photos parameter and delay parameter.
# Delay parameter does not take in account the fime for raspistill operation.
# raspistill takes about 5 seconds.
if test $# -eq 0
then
	echo "You need to enter two numbers after the takepics.sh command."
	echo "The first number is the number of photos to be taken."
	echo "The second number is the delay value in units of seconds between photo."
	exit 1
fi
# Create a directory with today's date if it is not present
picdir=~/Pictures/$(date --rfc-3339=date)
if [ -d $picdir ]; then
	echo "directory $picdir exits"
else
	echo "Created directory $picdir"
	mkdir $picdir
	mkdir $picdir/log
fi
# Set up start and stop numbers for loop
# Make sure photos do not over righ existing photos.
filecnt=$(ls ${picdir} | wc -l)
let filesend=${1}+${filecnt}-1
# Take phtotos loop and create log file of date, time and photo file.
for i in $(seq ${filecnt} ${filesend})
do
	filename=${picdir}/pic_$i.jpg
	echo "$(date) ${filename}"
	echo "$(date) ${filename}" >> ${picdir}/log/picslog.txt
	raspistill -v -o ${filename}
	sleep ${2}s
done
exit 0
Turning on the headless RPi Zero W:
Shutdown the RPi Zero W by remote RPi P3 Model B:
Related projects:
Firefox Extended Support Release (ESR) is a powerful, extensible web browser with support for modern web application technologies. This is a metapackage depending on all available localizations of Firefox ESR
The below installation uses the PIXEL Desktop GUI.
To open Firefox.
Firefox website.
scrot (SCReen shOT) is a simple command line screen capture utility that uses imlib2 to grab and save images. Multiple image formats are supported through imlib2's dynamic saver modules.
IF scrot is not installed on your RPi the below installation uses the PIXEL Desktop GUI.
To use scrot.
For help scrot.
pi@raspberrypi:~ $ scrot -h
Usage : scrot [OPTIONS]... [FILE]
  Where FILE is the target file for the screenshot.
  If FILE is not specified, a date-stamped file will be dropped in the
  current directory.
  See man scrot for more details
  -h, --help                display this help and exit
  -v, --version             output version information and exit
  -b, --border              When selecting a window, grab wm border too
  -c, --count               show a countdown before taking the shot
  -d, --delay NUM           wait NUM seconds before taking a shot
  -e, --exec APP            run APP on the resulting screenshot
  -q, --quality NUM         Image quality (1-100) high value means
                            high size, low compression. Default: 75.
                            For lossless compression formats, like png,
                            low quality means high compression.
  -m, --multidisp           For multiple heads, grab shot from each
                            and join them together.
  -s, --select              interactively choose a window or rectangle
                            with the mouse
  -u, --focused             use the currently focused window
  -t, --thumb NUM           generate thumbnail too. NUM is the percentage
                            of the original size for the thumbnail to be,
                            or the geometry in percent, e.g. 50x60 or 80x20.
  -z, --silent              Prevent beeping

  SPECIAL STRINGS
  Both the --exec and filename parameters can take format specifiers
  that are expanded by scrot when encountered.
  There are two types of format specifier. Characters preceded by a '%'
  are interpreted by strftime(2). See man strftime for examples.
  These options may be used to refer to the current date and time.
  The second kind are internal to scrot  and are prefixed by '$'
  The following specifiers are recognised:
                  $f image path/filename (ignored when used in the filename)
                  $m thumbnail path/filename
                  $n image name (ignored when used in the filename)
                  $s image size (bytes) (ignored when used in the filename)
                  $p image pixel size
                  $w image width
                  $h image height
                  $t image format
                  $$  prints a literal '$'
                  \n prints a newline (ignored when used in the filename)
  Example:
          scrot '%Y-%m-%d_$wx$h_scrot.png' -e 'mv $f ~/images/shots/'
          Creates a file called something like 2000-10-30_2560x1024_scrot.png
          and moves it to your images directory.

This program is free software see the file COPYING for licensing info.
Copyright Tom Gilbert 2000
Email bugs to
pi@raspberrypi:~ $
scrot web site.
MagPi issue 73, page 36 PI 101: Take Screenshots.
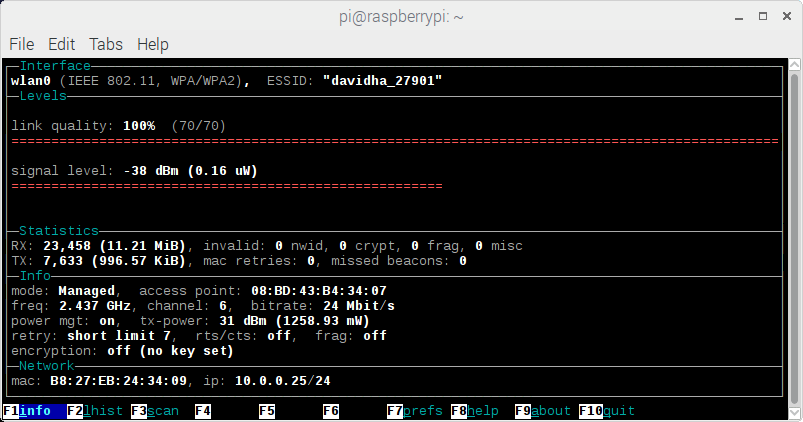
The above screen capture shows the RPi Wi-Fi
(IEEE 802.11 )
status.
This status is the result of the command wavemon with no options in the Terminal window.
Wavemon allows you to watch signal and noise levels,
packet statistics, device configuration and network
parameters of your wireless network hardware.
The below installation uses the PIXEL Desktop GUI.
Examples:
pi@raspberrypi:~ $ wavemon -h usage: wavemon [ -dhlrv ] [ -i ifname ] -d Dump the current device status to stdout and exit -g Ensure screen is sufficiently dimensioned -h This help screen -iUse specified network interface (default: auto) -r Generate random levels (for testing purposes) -v Print version number pi@raspberrypi:~ $ pi@raspberrypi:~ $ wavemon -d Configured device: wlan0 (IEEE 802.11) Security: WPA, WPA2, TKIP, CCMP Key sizes: WEP-40, WEP-104 essid: "davidha_27901" channel: 6 frequency: 2.437 GHz tx-power: 31 dBm (1258.93 mW) mode: Managed access point: 08:BD:43:B4:34:07 bitrate: 24 Mbit/s retry: short limit 7 rts thr: off frag thr: off encryption: n/a (requires CAP_NET_ADMIN permissions) power management: on link quality: 68/70 signal level: -42 dBm (0.06 uW) noise level: 0 dBm (1.00 mW) SNR: -42 dB RX total: 22989 packets (11.16 MiB) invalid nwid: 0 invalid key: 0 invalid fragm.: 0 missed beacons: 0 misc errors: 0 TX total: 7627 packets (995.99 KiB) exc. MAC retries: 0
List of Commands for Wifi Monitoring/Troubleshooting
pi@raspberrypi:~ $ sudo iwlist wlan0 scan
wlan0     Scan completed :
          Cell 01 - Address: 08:BD:43:B4:34:07
                    Channel:6
                    Frequency:2.437 GHz (Channel 6)
                    Quality=70/70  Signal level=-34 dBm
                    Encryption key:on
                    ESSID:"davidha_27901"
                    Bit Rates:1 Mb/s; 2 Mb/s; 5.5 Mb/s; 11 Mb/s; 6 Mb/s
                              9 Mb/s; 12 Mb/s; 18 Mb/s
                    Bit Rates:24 Mb/s; 36 Mb/s; 48 Mb/s; 54 Mb/s
                    Mode:Master
                    Extra:tsf=0000000000000000
                    Extra: Last beacon: 30ms ago
                    IE: Unknown: 000D646176696468615F3237393031
                    IE: Unknown: 010882848B960C121824
                    IE: Unknown: 030106
                    IE: Unknown: 050400020000
                    IE: Unknown: 2A0100
                    IE: Unknown: 32043048606C
                    IE: Unknown: 2D1AAD0103FFFF0000000000000000000000000000000406E6E70D00
                    IE: Unknown: 3D1606080400000000000000000000000000000000000000
                    IE: Unknown: 4A0E14000A002C01C800140005001900
                    IE: Unknown: 7F0101
                    IE: Unknown: DD180050F2020101820003A4000027A4000042435E0062322F00
                    IE: Unknown: DD1E00904C33AD0103FFFF0000000000000000000000000000000406E6E70D00
                    IE: Unknown: DD1A00904C3406080400000000000000000000000000000000000000
                    IE: Unknown: DD0900037F01010000FF7F
                    IE: IEEE 802.11i/WPA2 Version 1
                        Group Cipher : CCMP
                        Pairwise Ciphers (1) : CCMP
                        Authentication Suites (1) : PSK
                    IE: Unknown: DD1D0050F204104A0001101044000102103C0001011049000600372A000120

pi@raspberrypi:~ $
For more information on WiFi Tools go to the web site.
Thanks to Jeff, W7ESC for this information.
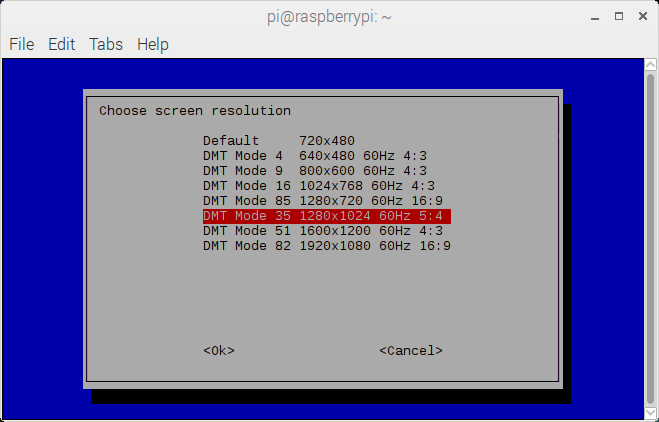
One day the HDMI TV started to cut off the left side of the RPi PIXEL desktop.
I could not get to the application menu to change the display resolution in
I was able to start Terminal.
Here is how to change the HDMI resolution in Terminal.
The advantages of a RPi image file:
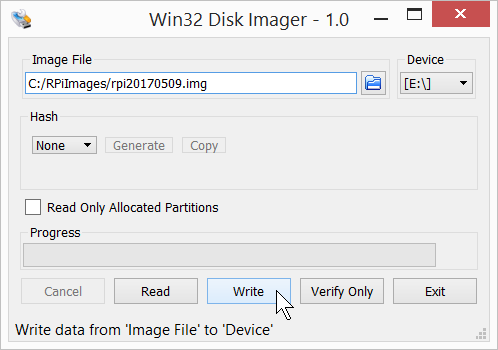
The image file is one file with the extension of .img. The image file contains all the partitions and volumes of the micro SD card drive.
Using a Windows PC.
Example of backing up a RPi micro SD card [E:\] to a image file (C:/RPi20170511.img).
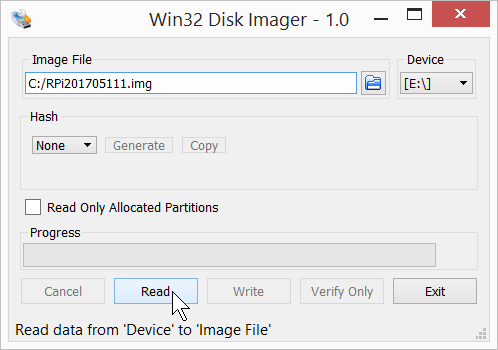
Writes a disk image, C:/RPiImages/rpi2017509.img file, to a micro SD card in [E:\].
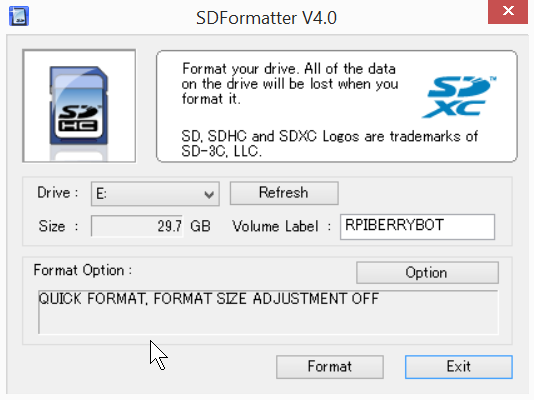
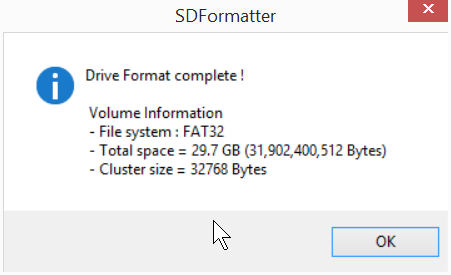
SD Formatter 4.0 ensures that the micro SD Card has a clean FAT32 format.
FAT32 formating a RPi micro SD card using a Windows PC.
BerryBoot allow multiple operating systems on a single micro SD card for the RPi. You select a operating system to use at boot time.
Installing Berry Boot using a Windows PC.
BerryBoot Android operation system install on a RPi P3 Model B.
BerryBoot Raspbian operating system install.
BerryBoot Raspbian Lite 2016.11 (243 MB) download worded the first time.
BerryBoot Memtester version 4.3.0 (32-bit) download worded the first time.
BerryBoot Puppy Linux alpha 4 download the first time.
BerryBoot OpenELEC downloaded on the second try.
openSUSE is another Linux operating system that runs on the RPi P3 Model B.
Websites:
The magazine Raspberry Pi Geek , issue 22, May/June 2017 contained a DVD with openSUSE Operating System (3.3 GB).
openSUSE installation using the Raspberry Pi Geek magazine DVD:

Ubuntu is another Linux operating system that runs on the RPi P3 Model B.
Installing Ubuntu:
Davids-MacBook-Pro:~ davidhaworth$ shasum -a 256 ubuntu-mate-16.04.2-desktop-armhf-raspberry-pi.img.xz

dc3afcad68a5de3ba683dc30d2093a3b5b3cd6b2c16c0b5de8d50fede78f75c2  ubuntu-mate-16.04.2-desktop-armhf-raspberry-pi.img.xz

Davids-MacBook-Pro:~ davidhaworth$ gunzip ubuntu-mate-16.04.2-desktop-armhf-raspberry-pi.img.xz
Davids-MacBook-Pro:~ davidhaworth$
Writes a disk image, ubuntu-mate-16.04.2-desktop-armhf-raspberry-pi.img file, to a micro SD card.
Other references:
The command line interface (CLI) keeps a history of the commands entered.
To see all the commands in history use the command:
To search for a command name in history use the command:
Running history command, use ! and the history command number.
Keyboard arrow keys operation
Manual for history command:
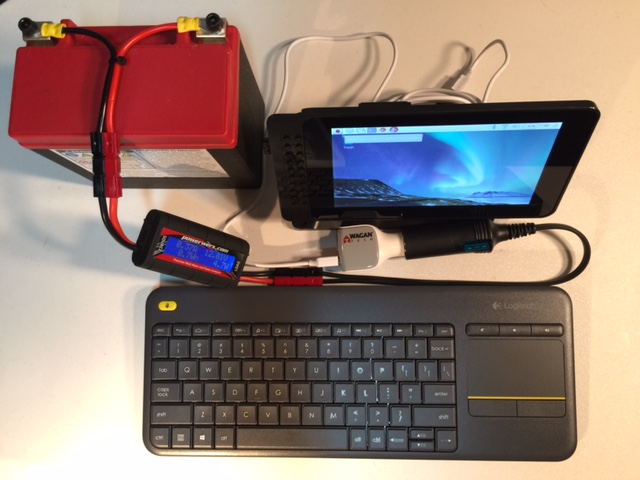
The purpose is to run the RPi off a 12 Vdc battery.
In the above photo is:Power usage from the battery includes the 12 V to 5 V power adapter and the RPi at 5 V:
A list of stores with RPi stuff that I a have purchased from and recommend.
A list of RPi stores for future reference:
The iPhone can be set up as a personal hotspot so that the RPi can connect to the Internet through the iPhone cell phone service.
This means the RPi can connect to the Internet when there is no Wi-Fi internet service available and there is cell phone coverage.
When the RPi is connected to the iPhone using Wi-Fi as a personal hotspot the iPhone cannot connect to Wi-Fi for internet access.
The iPhone uses the cell phone to connect to the internet.
Your cell phone service may charge you for data service used.
This project takes a RPi Zero W and solders a 40 pin socket on the bottom of the circuit board.
Next, the RPi Zero W is plugged into to a GPIO extension board that plugs into a white breadboard strip.
A another computer (RPi P3 Model B or MacBook) is used to control the RPi Zeron W breadboard computer using Wi-Fi and SSH.
The RPi Zero W breadboard computer only needs power using the micro USB connector.
Building the RPi Zero W Breadboard computer system:
Use a DMM to test the 5 Vdc and 3.3 Vdc on the RPi Zero W breadboard computer.
Check the 5 Volts DC on the breadboard.
WARNING, never connect the 5 V directly to the other pins of the breadboard.
The other pins are connected to the CPU IC and the CPU runs on 3.3 V.
The 5 V attached to these pins will most likely destroy the RPi CPU.
Check the 3.3 Volts DC on the breadboard.
WARNING, never connect the 5 V and 3.3 V directly to each other.
This will short the two different power supply voltage to each other and damage may occur.
WARNING, never connect the 5 V or 3.3 V directly to ground.
This will short the power supply voltage to ground and damage may occur.
GUN Nano is a simple command line interface text editor that is used at the command line interface or Terminal window.
Nano is one of many command line text editors that is available.
With SSH and Nano you can create a Python programs on a remote RPi computer that has no display, keyboard or mouse.
The below example create a Python hello world program with Nano.
Checking the hello_world.py file.
Web sites:
Use a RPi P3 Model B to remote program the RPi Zero W breadboard computer with Python.
In the command line interface use SSH, Nano and Python 3 to create and run a Python program on the RPi Zero W breadboard computer.
Requirements:
Procedure:
Related projects:
SSH allow another computer to control the RPi with the command line interface and the Terminal window in the PIXEL Desktop GUI.
Before turning on SSH make sure you change the default password of RPi.
Below are two methods to enable SSH on the RPi.
Method 1 using PIXEL Desktop GUI:
Method 2 using command line interface uses the Raspberry Pi Software Configuration Tool (sudo raspi-config):
Related projects:
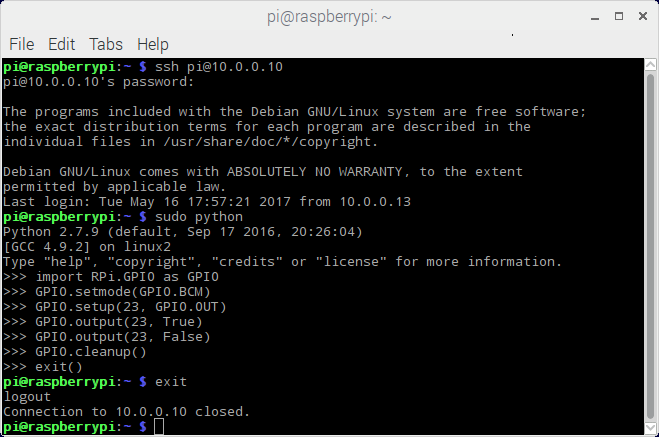
Use a DMM and Python interactive mode to test the GPIO23 on the RPi Zero W breadboard using a
SSH remote control with a RPi P3 Model B.
Python interactive mode is used to turn on and off GPIO23.
GPIO23 off (False state) is 0 V and the on (True state) is 3.3 Vdc with no load attached.
Requirements:
Procedure:
Related projects:
XScreenSaver is a screen saver that works in the RPi PIXEL Desktop GUI. RPi PIXEL Desktop GUI is based on X11.
XScreenSaver is a modular screen saver and locker for X11, containing more than 200 screen savers. This package includes the bare minimum needed to blank and lock your screen. Install this package if you prefer xscreensaver to gnome-screensaver. If you prefer gnome-screensaver, you don't need to install this package. The graphical display modes are in the xscreensaver-data, xscreensaver-data-extra, xscreensaver-gl and xscreensaver-gl-extra packages.
The below installation uses the RPi PIXEL Desktop GUI.
XScreenSaver verson 5.30, 11-Sep-2014 was installed with the above install process.
To open XScreenSaver settings.
When XScreenSaver is running, move the mouse or use the ESC key to exit the screen saver.
XScreenSaver default timer is 10 minutes and can be change in the Screensaver preferences.
The XScreenSaver installed display modes include:XScreenSaver runs automatically. To turn XScreenSaver off go the XScreenSaver settings File menu and select Kill Daemon.
XScreenSaver website.
Virtual Consoles (VC) allow a user to have multiple sessions and multiple logins on the same RPi.
For example, you use a program in one VC and in another VC you read its documentation.
The RPi seven Virtual Consoles are tty1, tty2, tty3, tty4, tty5, tty6 and tty7.
Virtual Consoles can be a Command Line Interface (CLI) or a PIXEL desktop GUI.
The RPi at power-on has six Virtual Consoles for the Command Line Interface (CLI) called tty1, tty2, tty3, tty4, tty5, and tty6.
The power-on Command Line Interface (CLI) is tty1.
The RPi at power-on has one Virtual Consoles tty7 for the PIXEL desktop GUI.
Virtual Consoles (VC) are also referred to as Virtual Terminals (VT).
How to switch to between VCs.
In a VC with the CLI you can start the PIXEL desktop GUI by entering starts command. This means that you can have multiple PIXEL desktops operating in different VC.
The more VCs that are being used the more RPi resources are being used. Therefore, the RPi may operate slower.
Links
The PIXEL Desktop GUI supports multiple desktops.
To add a desktops:
To go to a desktops:
To go to a running program:
To cycle through the different desktops:
To remove the last desktops:
Desktops are also called workspaces.
Mouse hints
Linkes
The CLI support the use of wildcards in directory names and files names.
All wildcard characters can be combined with wildcard characters and other characters.
* Wildcard character for any number of characters.
? Wildcard character for any one character.
[set] Wildcard characters for any one character in the set.
[!set] Wildcard characters or any one character NOT in the set.
Linkes
Book
BASH is Bourne Again SHell.
CLI command for BASH version:
Book
BASH is Bourne Again SHell.
CLI command for BASH version:
Linkes
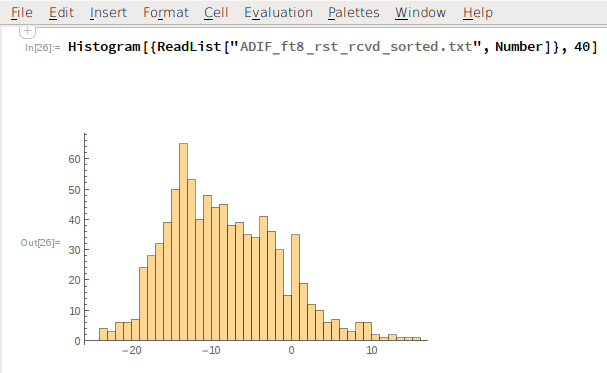
Wolfram Mathematica is a standard part of the Raspbian release.
The above screen capture shows a histogram of the counts of FT8 signal reports received from other amateur radio stations.
The histogram was created with a single line of code that is above the histogram plot.
The signal reports are numbers in ASCII, one number (range from -24 to +15) per line.
Signal report -14 was received the most from other amateur radio stations.
Linkes
sed is a stream editor that is used in the Linux command line interface (CLI).
Linkes
LibreOffice Impress is a presentation program that is part of the standard Raspbian OS install.
Linkes
Raspbian is the official operating system software for the Raspberry Pi and its roots go back to Unix.
Timeline
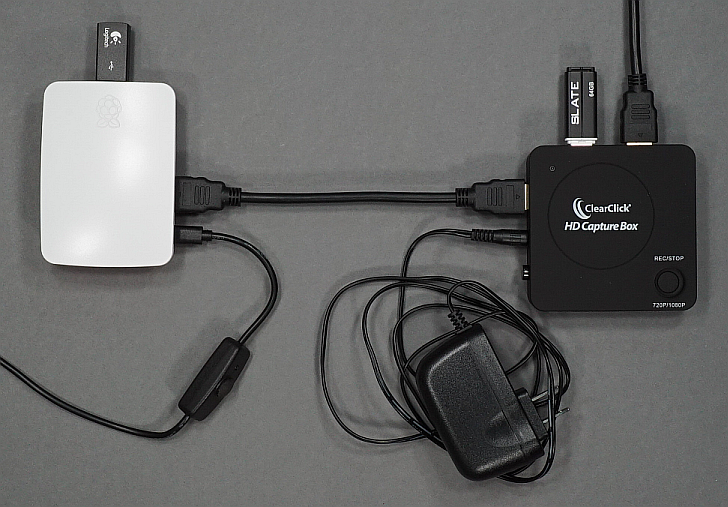
This project's objective is to capture the Raspberry Pi HDMI video and not have to use a video camera to capture the monitor screen.
The ClearClick HD Capture Box captures the Raspberry Pi HDMI video output and records the video as a MP4 video file on the USB memory device that is plugged into the ClearClick HD Capture Box.
The ClearClick HD Capture Box captures the video as 1080 or 720 MP4 file which is selected by holding the record button down for 5 seconds.
I use 720 MP4 format because the files are smaller than the 1080 MP4 files.
The ClearClick HD Capture Box doe not capture HDMI audio. ClearClick HD Capture Box has an audio mic input which I have not used.
Linkes
gnome-screenshot is an utility to capture the screen display and save it as an image file.
Internet connection is required to install the software and commands in the CLI are used.
To install Ggnome-screenshot.
How to use gnome-screenshot is in the MagPi issue 73, page 36 PI 101: Take Screenshots.
Raspbian default sound system is PulseAudio (PulseAudio).
The Raspberry Pi has headphones jack for audio output. There is no audio mic input. For audio input a USB audio device or audio hat is needed.
Other audio systems that can be installed on the Raspberry Pi.
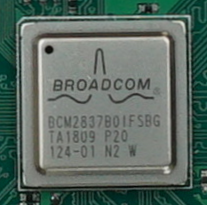
Above photo is a Raspberry Pi Model 3 B+ CPU with its standard metal cover to improve heat cooling.
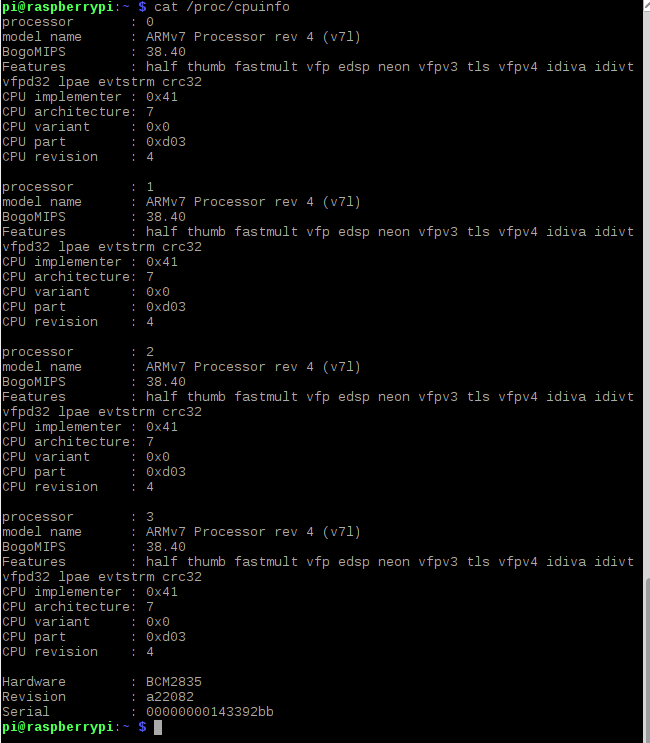
Below are three CLI command to display the CPU information for a Raspberry Pi Model 3 B.


Below is the CLI command to display Raspbian information for a Raspberry Pi Model 3 B.
Below Raspbian information is for a Raspberry Pi Model 3 B+ (NOOBS version 3.0.0, release date 2018-11-16 ).
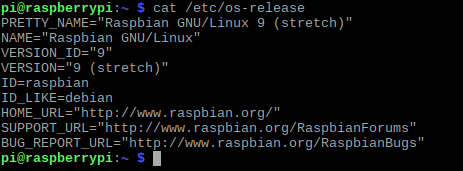
Below Raspbian information is for a Raspberry Pi Model 3 B install the is several years old.
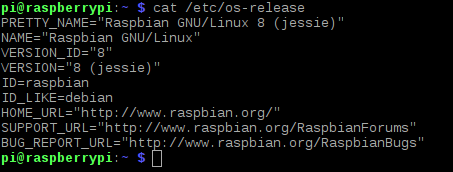
Debian APT updates and upgrades do not install a new version of Linux from version 8 to version 9.
NOOPS v3.0.0 is used to install Raspbian GNU, Linux 9 (stretch).
Setting up the SD card installation.
Links
NTP is a way for the RPi to use the Internet to set its clock.
The RPi does not keep time when it is powered off.
At power on the RPi can automatically set its clock if it is connected to the Internet.
The CLI ntpdate command is used to set the time and date.
Installing ntpdate
CLI usage
Documentation
GNU Octave is a scientific programming language that is mostly compatible with Matlab .
Internet connection is required to install the software and commands in the CLI are used.
To install Ggnome-screenshot.
How to use gnome-screenshot is in the MagPi issue 73, page 36 PI 101: Take Screenshots.
Documentation
edX Introduction to Linux is a limited time free audit access online course by the LinuxFoundationX.
The course is a combination of video and text sessions.
edX offers over 2,000 courses that include Linux, counter science, signal processing, electronics, etc. from major universities.
I use edX on MacBook, iPhone and iPad.
My course notes.
Chapter 1
Chapter 2
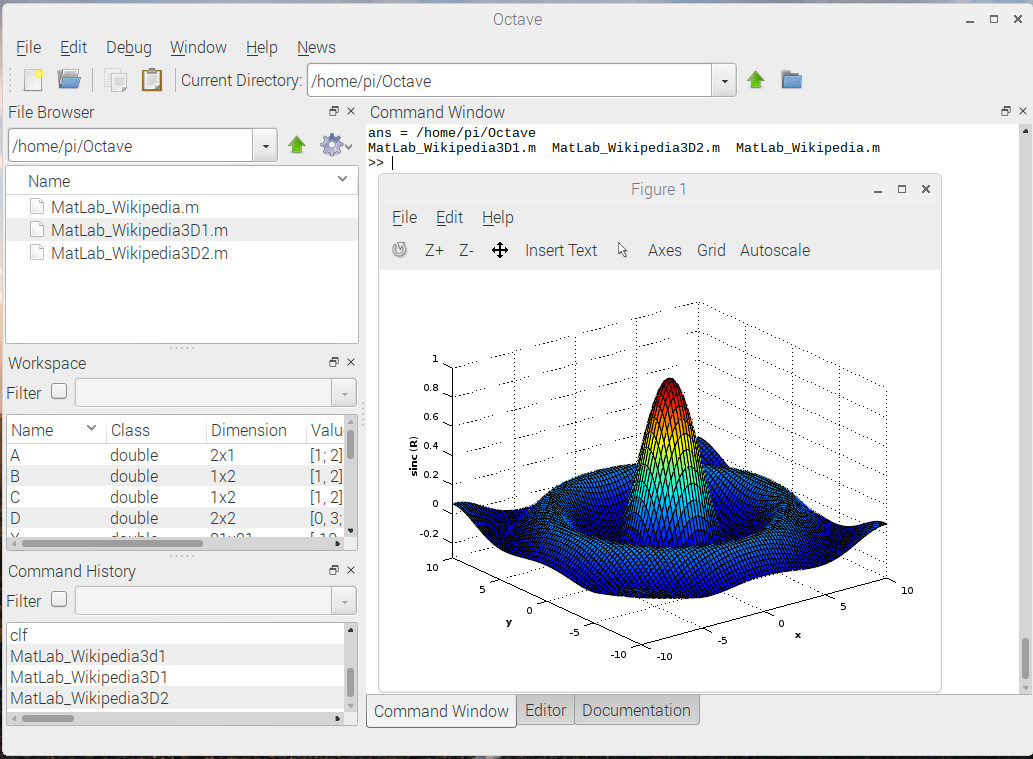
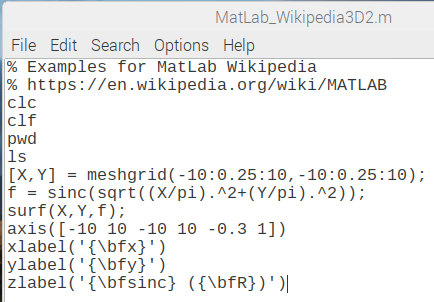
GNU Octave is a powerful programming language that is free and is mostly compatible with the commercial MatLab software.
The above screen shots show a MatLab 3-D demo program running on Octave on the Raspberry Pi. A text file called MatLab_Wikipedia3D2.m was created with the Raspberry Pi text editor and saved in directory called Octave. In Octave CLI the command cd Octave was executed and the file name without .m was entered (MatLab_Wikipedia3D2).
Octave CLI is similar to Linux CLI. Linux CLI history and command completion works in Octave CLI.
Installing Octave
Octave
Octave YouTube tutorials
Octave tutorials
Octave code
Selective Octave CLI commands
MatLab
Below is a list of glossary links.
- HOME - SDR & GNU Radio - RPi PROJECTS - RADIO RPi PROJECTS - SATELLITES - WEATHER SATELLITES - RADIO ASTRONOMY - QRZ -
© May 16, 2017
David Haworth,
WA9ONY
www.stargazing.net/david